Before we kick off, here’s an aside – straight off the bat. I clearly did not take the 3-D module at art college! This is by no means the best way to build a chair because my way doesn’t naturally support the structure… But it’s simple and works for me, and if you have the kit listed below, it’ll work for you too.
Because I use a hot glue gun for this project, this is not recommended for younger children (I’ve vouched for that myself thanks to many a singed finger-tip!).
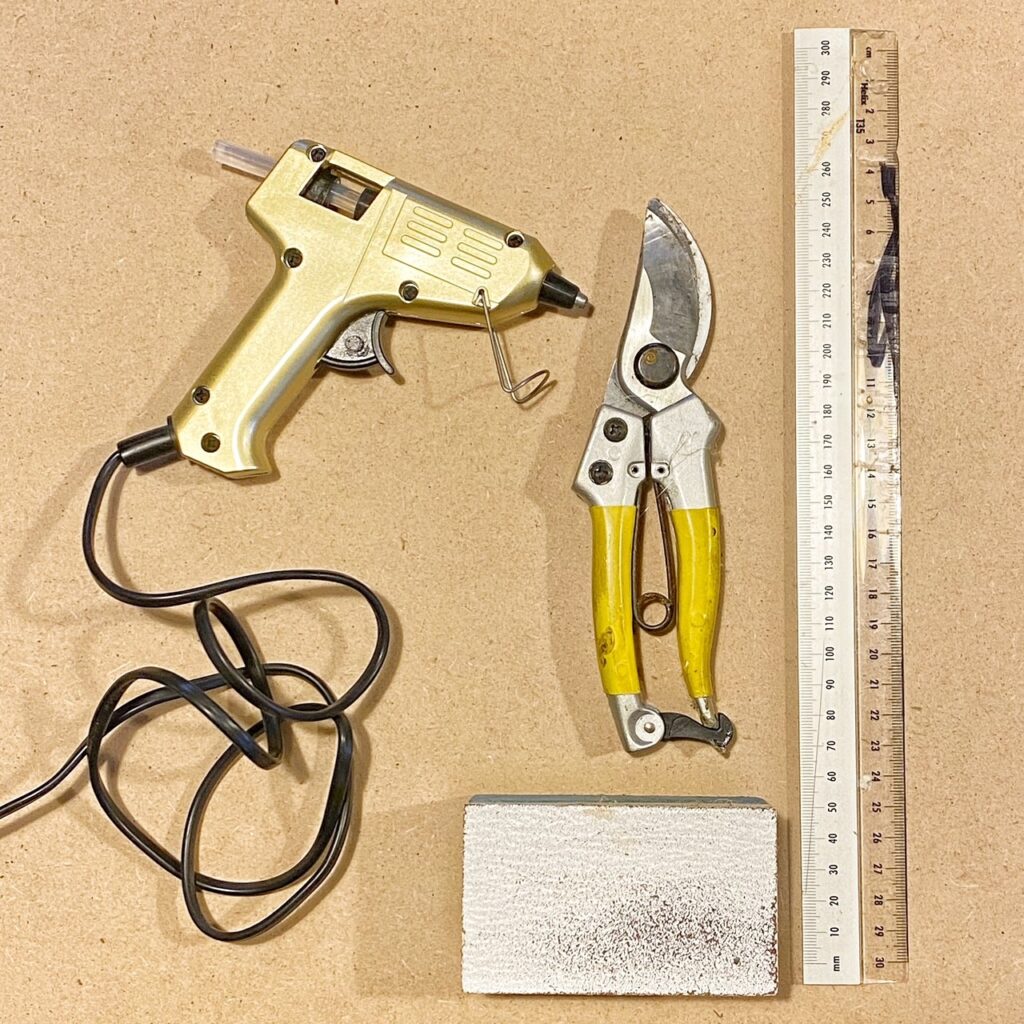
What tools you’ll need:
A ruler
A pair of secateurs / cutter pliers
A small sanding block
Metal tweasers (not pictured, not vital, but very handy)
A glue gun*
* I’m often asked what mysterious bonding method I use for Little Folk. The truth is I use a standard craft 11mm gun for all my projects! I’ve trialled various wood glues and combinations thereof in the past, but I always went back to a standard glue gun. The mini glue gun pictured is indicative only – these are really cost effective, but not very effective in my experience as the glue never gets hot enough, but are more than sufficient for the odd, fun, home project… At the other end of the scale I find the heavy duty, commercial guns too cumbersome for the smaller details.
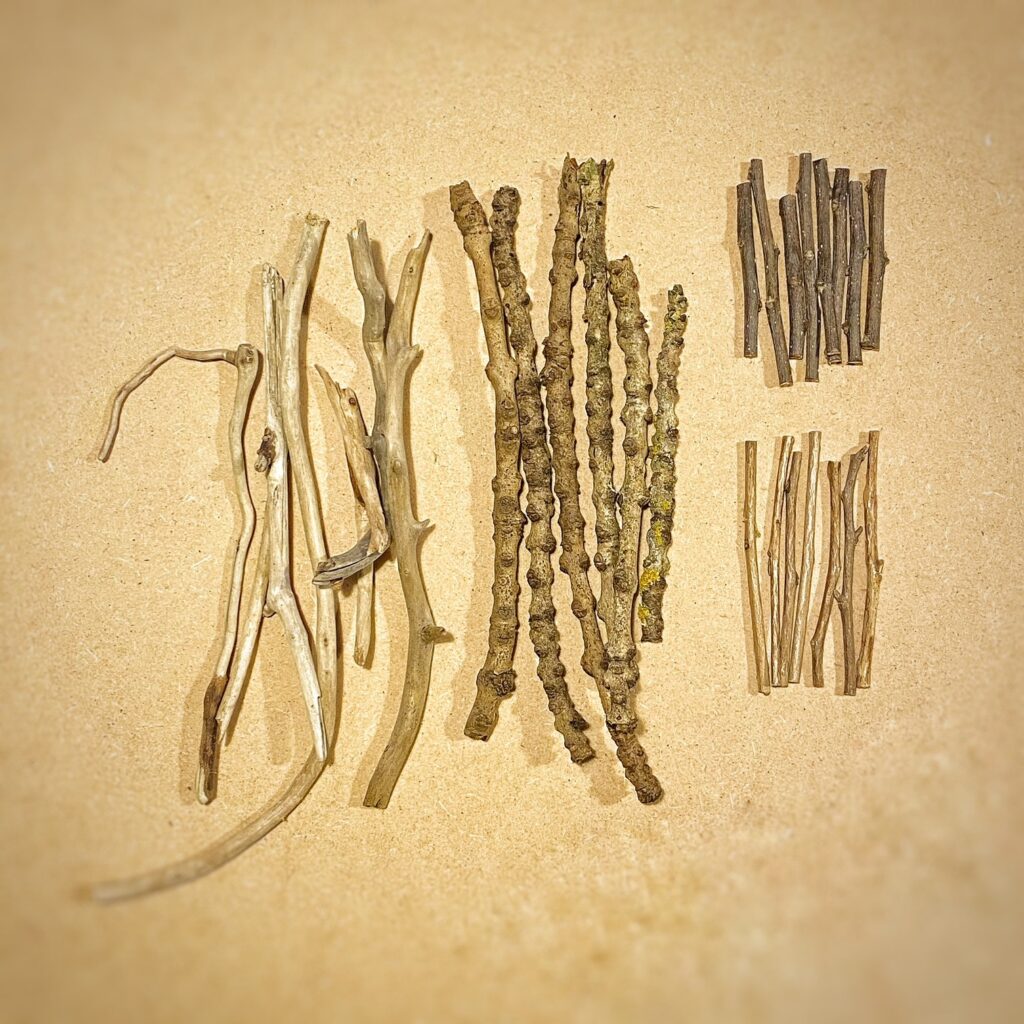
- Collect twigs
Gather a bundle of slim twigs of any type, season them thoroughly in a dry, ambient area before you start your project. I love mixing up what type of wood I use because each tree will give you different characteristics and details and therefore a completely distinctive look each time. Elm is beautifully knobbly and therefore witchy and whimsical. Birch or hazel whips work really well once dried because they’re so solid and durable. Driftwood is appealing because of its smooth form and individual furls and curls…
Whatever you choose, put aside a small handful which match in width as far as possible.
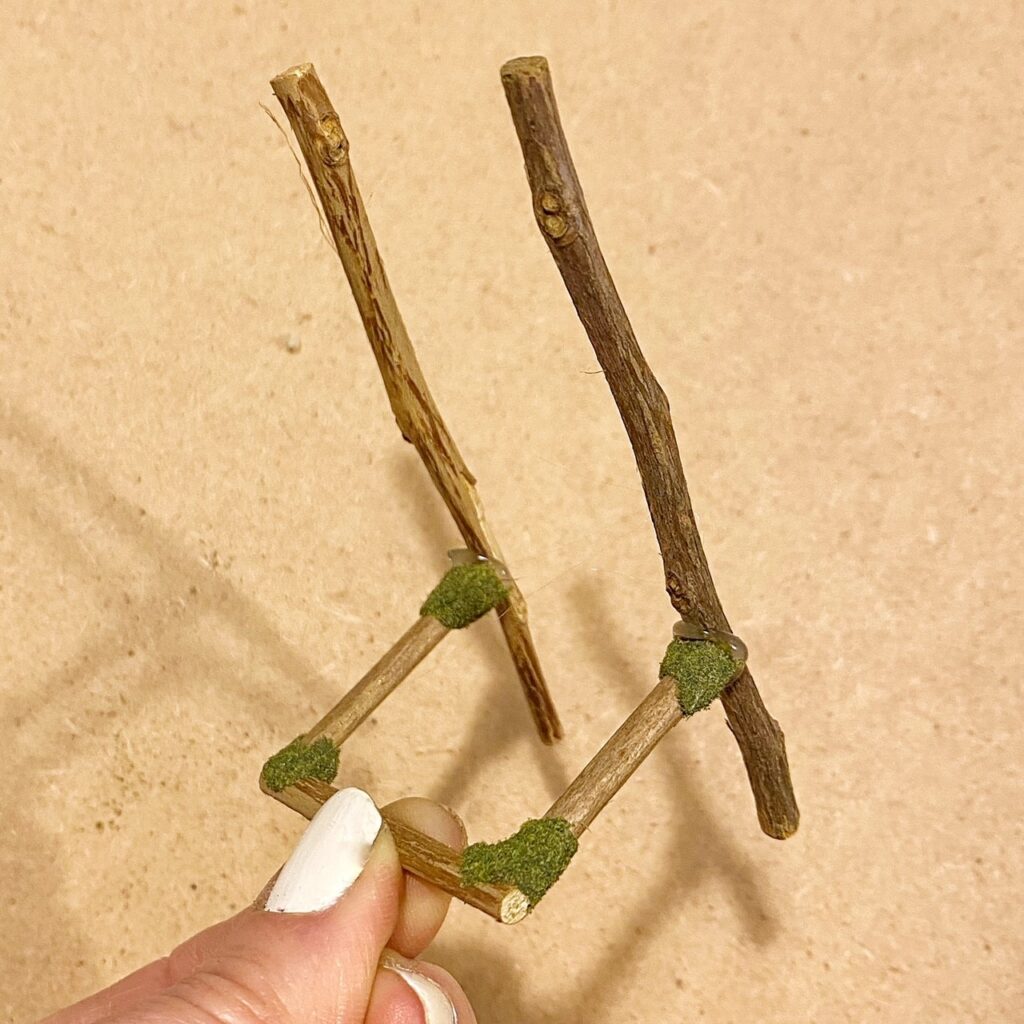
- Form the base of the chair seat
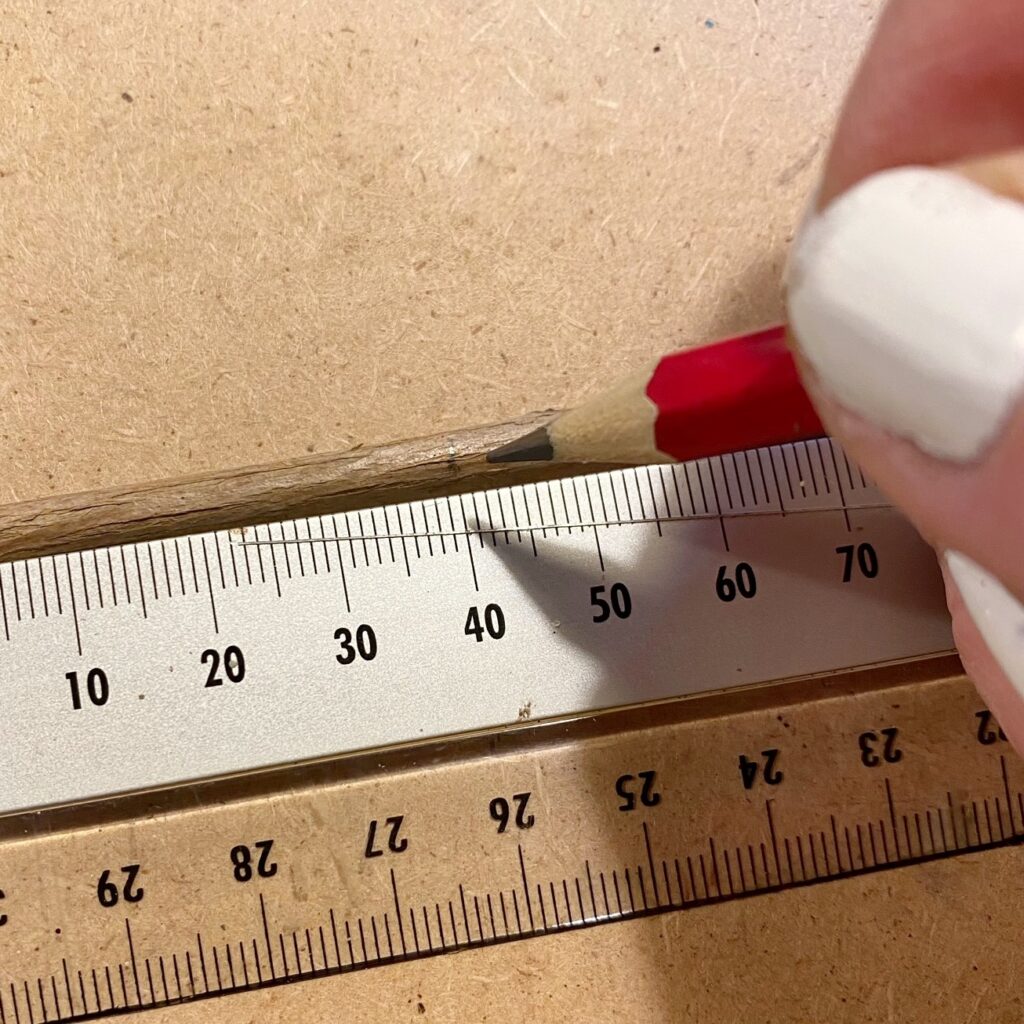
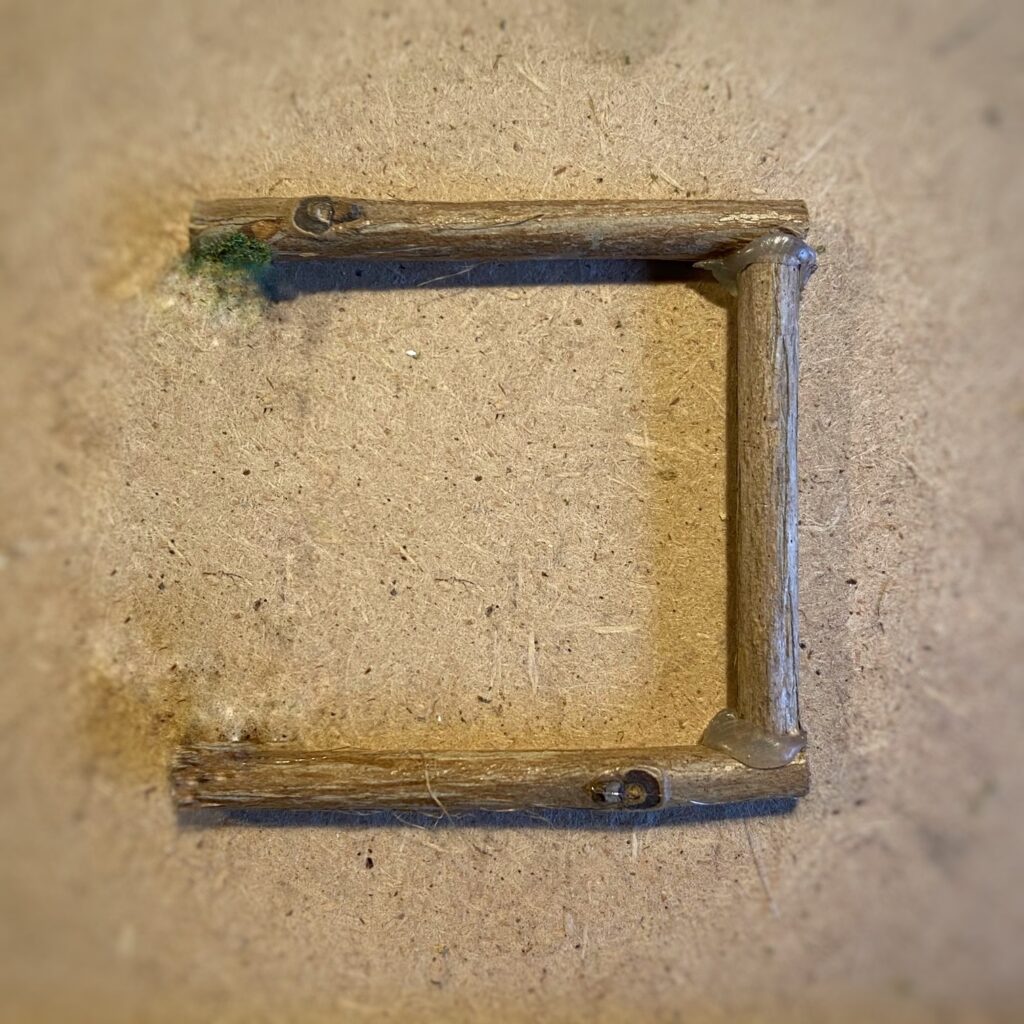
Firstly, you need to create a square U shape (minus the back slat).
The chair I made here is to a scale of 1:12 (typical dollhouse size). Measure and cut two twigs to 3.5cm (which will form the sides) and one to 4cm (which will make the front).
Glue the two side twigs to the outer ends of the front twig. It’s worth sanding the end edges of the side twigs and the surface of the front twig, to help the glue bond well where the two meet. Don’t worry about the cosmetics of the glue when it dries – you can cover and dress this later.
- Add the rear legs
Cut two twigs to 10cm and gain, sand and adhere to your seat base with the base sitting around 3cm off the ground.
- Complete your seat base
I always add the seat twigs before completing the structure of the seat by adding the front struts and arm rests, because this is a fiddly bit and the overall result looks neater if you do this bit first.
As you’ll be laying a series of twigs on top of the two sides, you’ll need to cut pieces which are just shy of 4cm. Start at the front, laying the first twig directly on top of the front strut. Work backwards, towards the seat back.
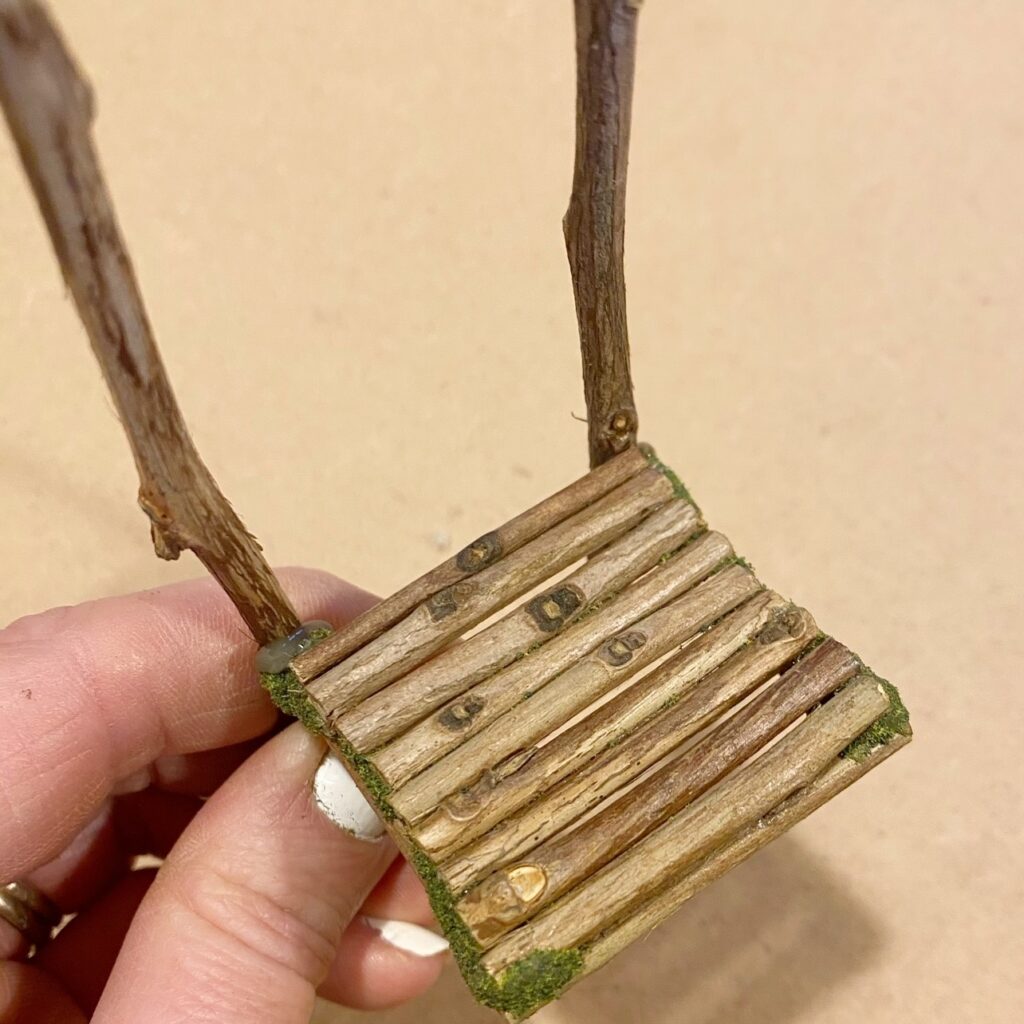
If you plan to adorn your seat with feathers, cotton pod cushions, petals etc. by covering it you needn’t worry about being too linear with the laying of your twig seat base, but remember you’ll be able to see gaps at the sides if you leave spaces.
- Add front struts and arm rests
Cut two twigs to 6cm to form your front arm stumps, sand and glue bond to the chair seat.
Whether I’m doing a chair or a throne, I think every fairy is regal enough to deserve more of a top table looking chair, by adding arm rests.
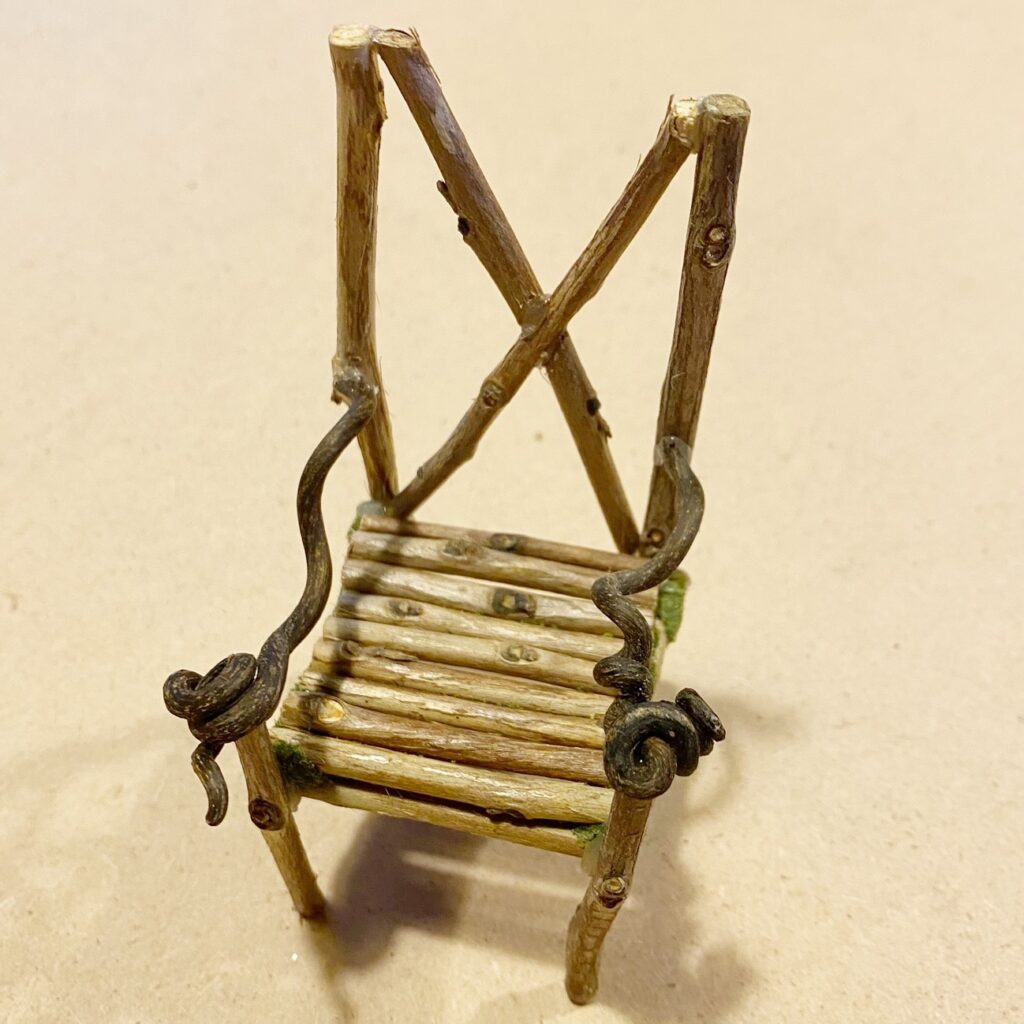
You can use more twigs you have to hand or, as I’ve done, give your chair more of an ethereal edge by using wavy vine tendrils.
Glue and bond as you have done with the previous parts of your chair.
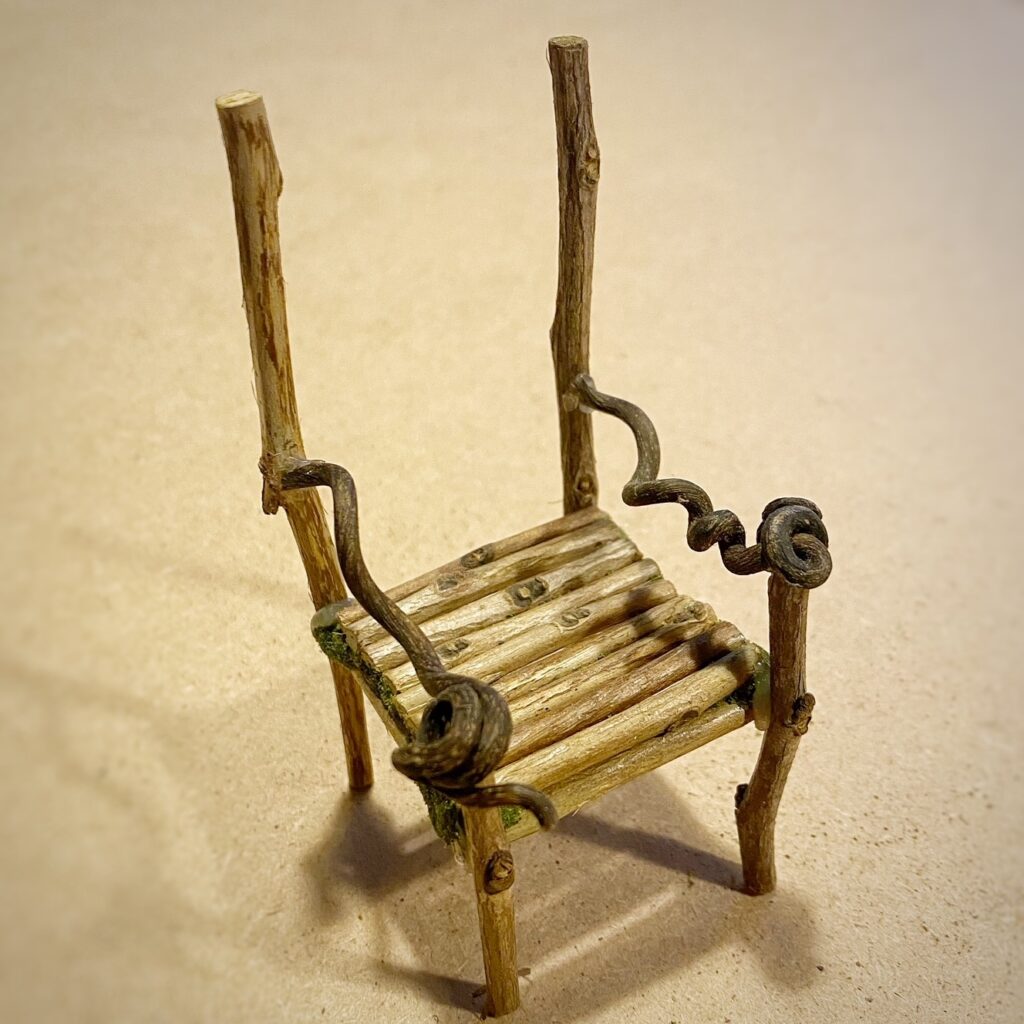
- Add whatever shape back rest you’d like
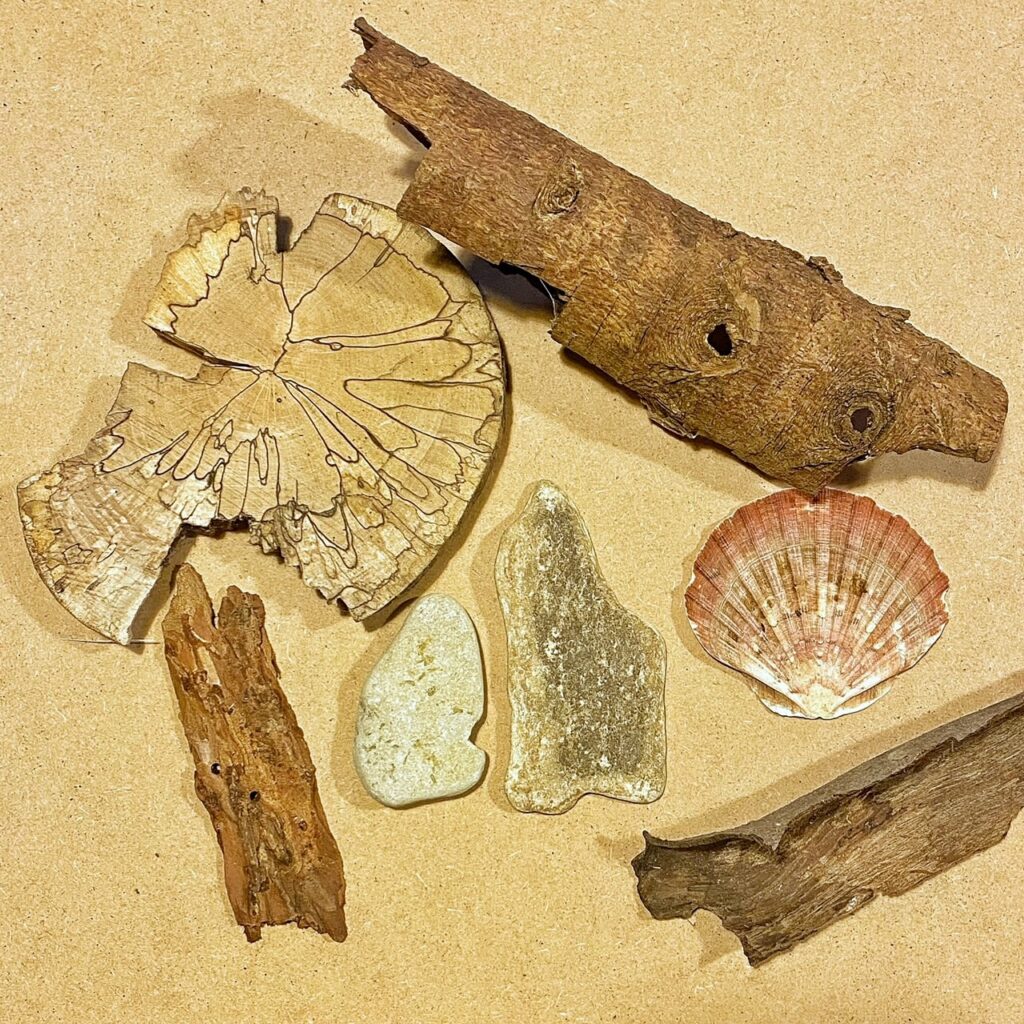
This is the last bonding process before you have your finished chair formation and for this part the sky’s the limit… You could use wood slices, or a curved piece of bark, shells or a slim pebble to make a solid backed chair, or continue with your twigs to make a stick or ladder back, cross (as I’ve done for this particular example), a star or intertwined, twirling vine back.
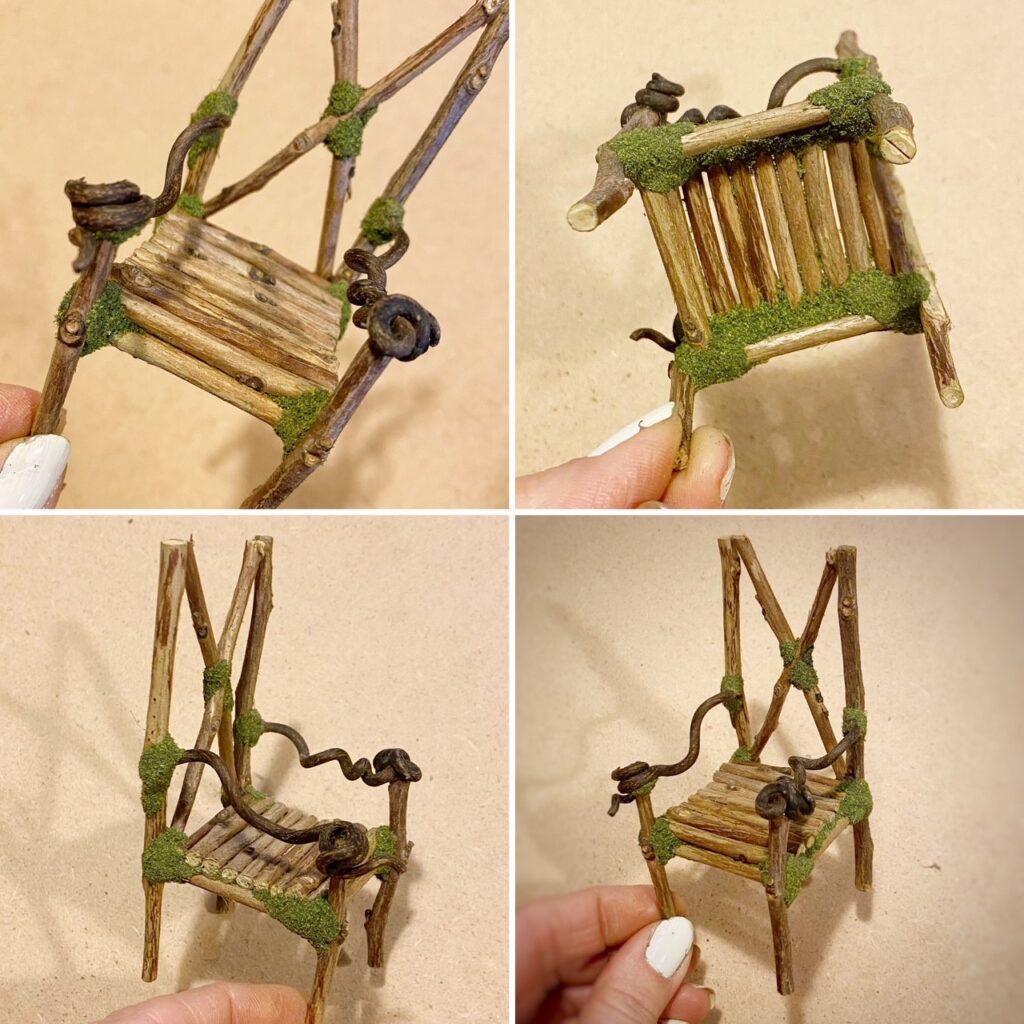
- Housekeeping!
Now you have a recognisable chair, but before the fun of adorning and making your chair personal to you can begin, you need to spend some time working around your chair, strengthening each join where you’ve glued by repeating the process and hiding the glue finish as you go.
There are lots of materials on the market you can use for this:
- ‘Blended Turf’: this green course powder-type material can be bought in craft or modelling shops and is the green grass base you’ll often see on model railways or scene setters. This is great for dressing small joins but the downside is it’s dear to buy for a one off project (expect to pay £5-15 per packet). It comes in different, natural colourways and you can choose its coarseness.
I plan to do another ‘How to’ based purely on techniques – and how best to apply blended turf would be right up there! In essence, as I’ve shown below, apply a small amount of glue and heap the turf on top straight away, dab with your finger to flatten and shape and keep heaping and dabbing until you’ve sufficiently hidden the glue. If you don’t apply enough turf, your finger will draw the glue from beneath and make a mess! Put a small tray underneath whilst turfing to prevent waste.
- Floristry bought moss or lichen from florist supply or craft shops.
- Your own foraged moss and lichen. If you have the time, this is cost effective and works just as well! As with your wood, dry it all out first. With moss, I would lay sections on a sheet outside for 24 hours to allow any bugs to crawl away and rehome themselves.
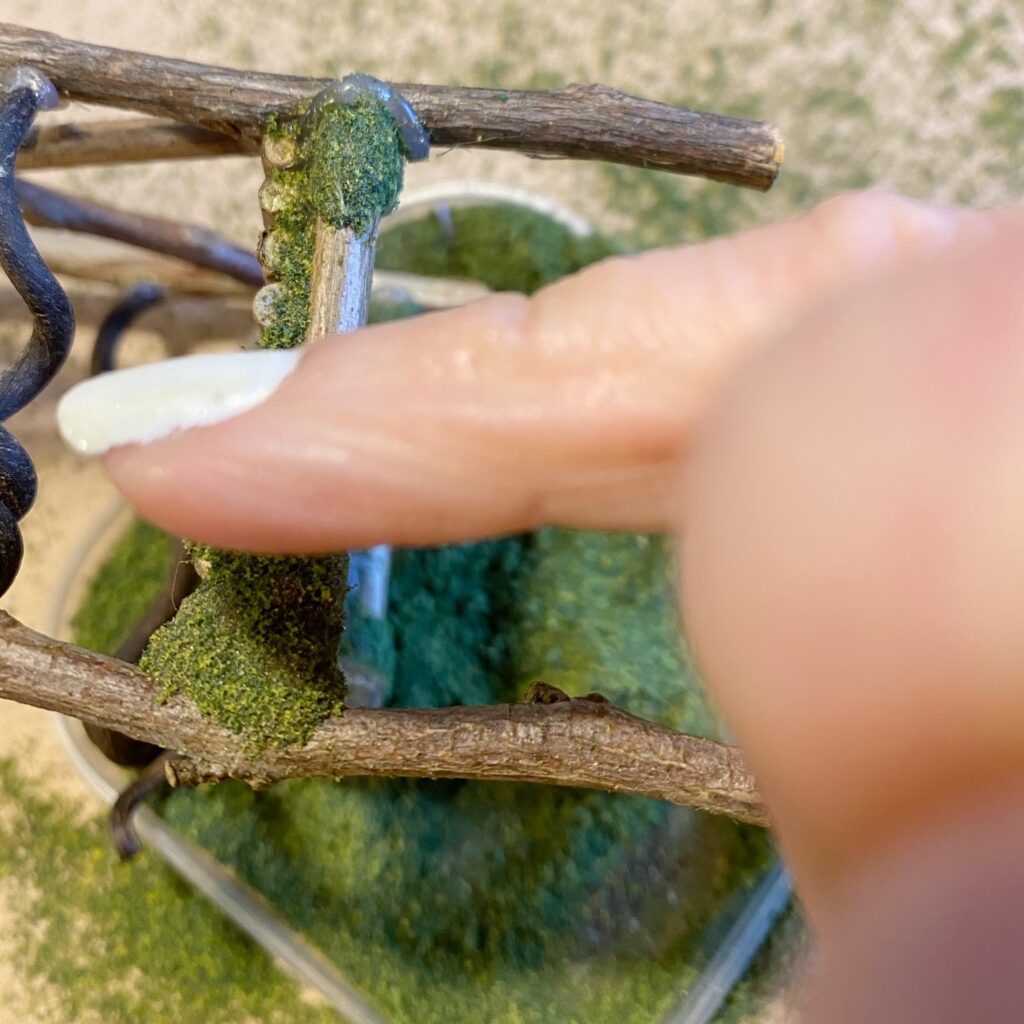
Work around your chair, applying another layer of glue to every join, but this time cover with turf, moss, lichen – or a combination – as you go, turning the chair and covering all angles. For very small areas, use tweasers to apply tiny clumps of moss/lichen to the glue as, helpfully, they don’t adhere to the glue as your fingers can and the fine end helps you to press tiny details of moss into any exposed glue.
There are various techniques and tips that are relevant for this too, which I’ll cover off another day!
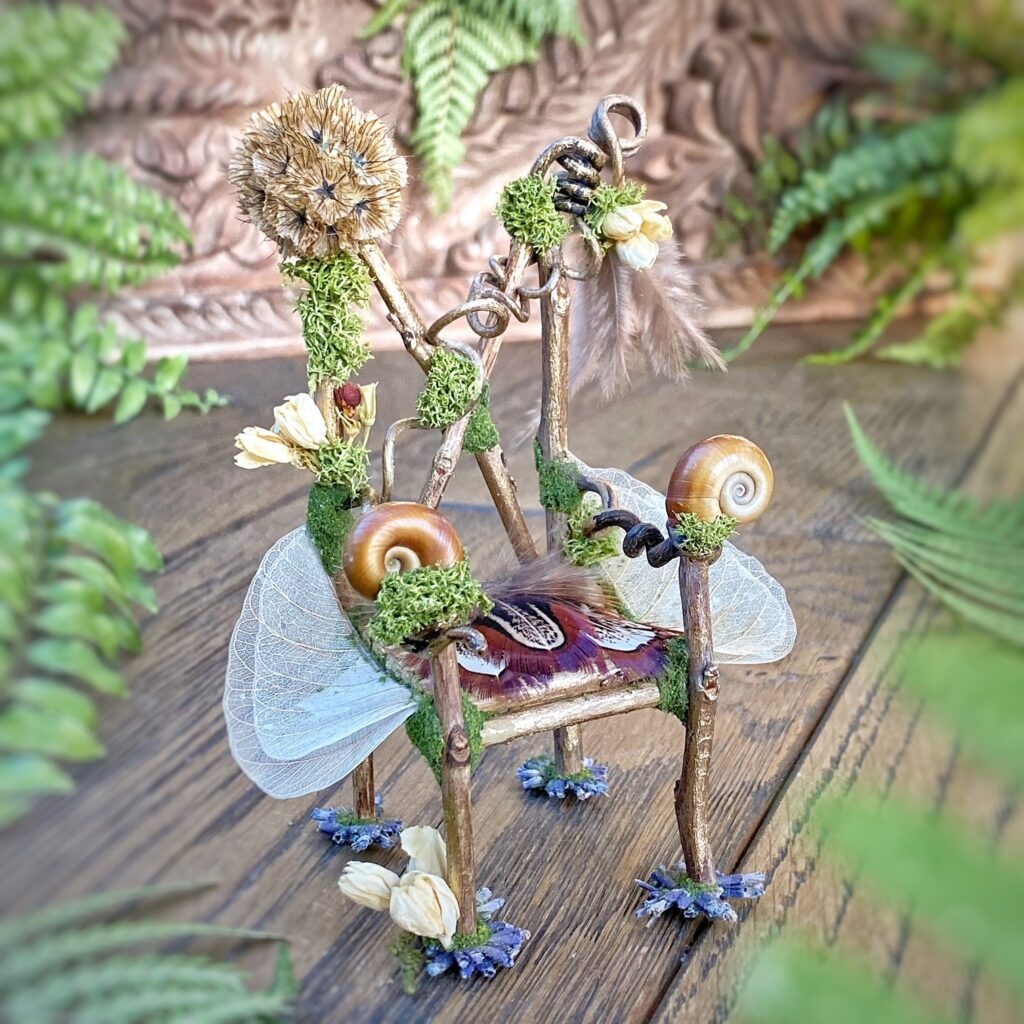
* Now you have the basic chair shape, the fun begins! *
Let your imagination run riot… Dry or press petals, leaves and ferns, use feathers, shells and pods… and it needn’t all be natural – how about beads and pieces of ribbon?
For this example I’ve:
- Given the chair some magical shimmer by dry brushing with gold paint;
- Added some additional tendril details;
- Used the furl of the water snail’s shape to finish off the arm rests;
- Created a pheasant feather spray to the seat and tucked it under at the rear;
- Added dried pods and small posies of dried flowers;
- Given the chair folded skeleton leaf ‘wings’ (I can’t get away from the image of my favourite Enid Blyton story of The Wishing Chair!);
- Given each leg a lavender foot
I’m planning on more blogs like this one, and also hope to include video clips going forward. For now, I hope this this step-by-step was clear, helpful and gave you a little va-va-voom to have a go yourself. I would love to see pictures of your chairs if you choose to have a go! Please tag @littlefolkuk and let me know what you’d like to learn next!